DJI E1200 Pro Upgrade for S900: Setup, Issues and Recomendations

DJI released the E1200 Pro propulsion system for the S900 airframe back in 2015 and since then they have received a lot of mixed reviews.

The E1200 system is a nice upgrade to the standard propulsion system which comes with the S900 and S1000 airframes. The first thing you will notice is the build quality and size – they seem to be more VW than Skoda, a little more refined.

E1200 benefits over stock S900 4114 Pro

  1. A max takeoff weight of 10.2Kg on the S900 (6 arms) vs the stocks 8.2Kg.
  2. Up to 20% longer flight times due to greater efficiency from the ESCs and Motors.
  3. Better control in windy conditions due to 17inch propellers vs 15 inch and increased thrust. 

Why did we originally purchase the E1200 system?

Well for all the reasons listed above. We wanted arms which could lift more and provide more thrust above what the stock arms provided, just in case we ever needed it. The main reason was that the extra few minutes of flight time which users were supposed to get from the ESC efficiency. In a nutshell, we just wanted ‘more’.

Our Build

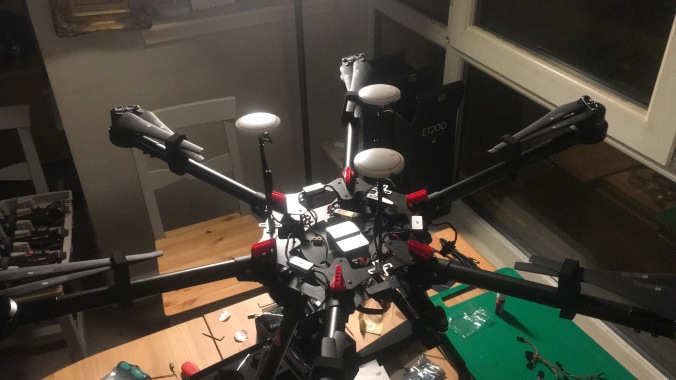
The drone which was using the E1200 was a custom S900, it is something which is becoming more popular for those wanting redundancy and custom options.

The specs are simple, an S900 airframe with and A3 Pro kit, Lightbridge 2, M600 X5 mounting plate, and an X5 series camera – something which was not possible with the old A2 flight controller. The build came in at 7Kg on the nose, right on the mark for the weight requirements of the E1200s.

So everything went great, right? No.

E1200 issues on the S900

We found that when arming the motors the arms would sway like crazy, settle a little once the props have fully extended but nevertheless continue to shake. When in the air you could see with the naked eye the vibrations, and subsequently the shake in the gimbal. Not only was it dangerous while having these vibrations going through the airframe, any video was unusable due to the shake, and any photos had to be taken with a high shutter.

So we set off on a quest to sort out these issues putting it down to teething issues with the build, the usual, gains, prop tightness. However, a long list of checks started to build.

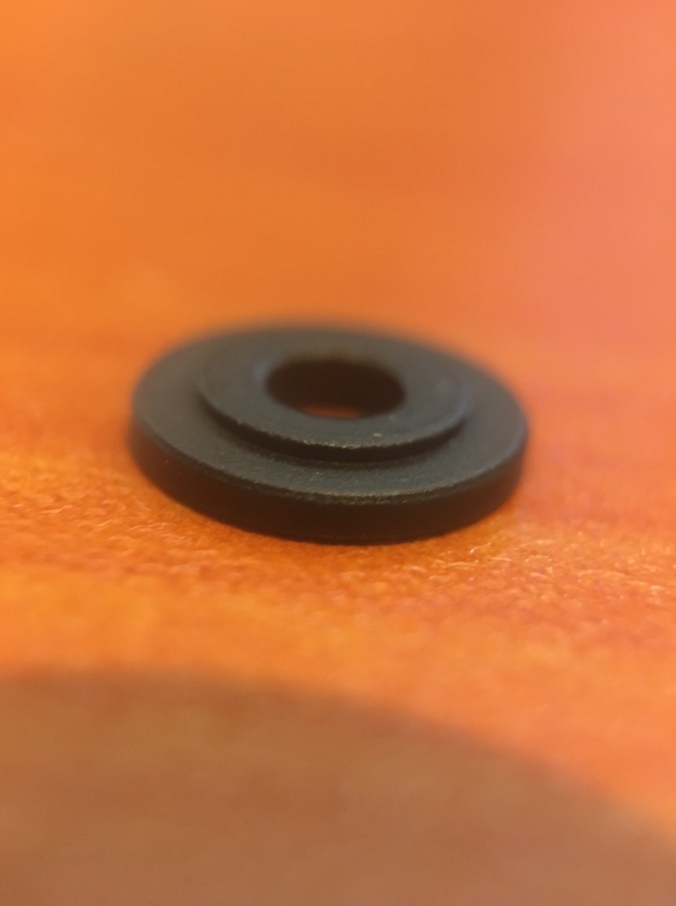
Now I feel it’s about the right time to state here that the E1200s have had a few different revisions, most notably with DJI switching the rubber motor mounts for plastic and metal washers, but we will get into that a little later.

The first 3 pairs we had used the metal washers with the shortened screws, not the original rubber mounts.

Dronely E1200 Metal Washer

What we tried in order to fix the issues

  1. First of all, we made the COG was correct. We balanced the system so that the COG was in the middle of the airframe, around 5 centimetres bellow the top plate.
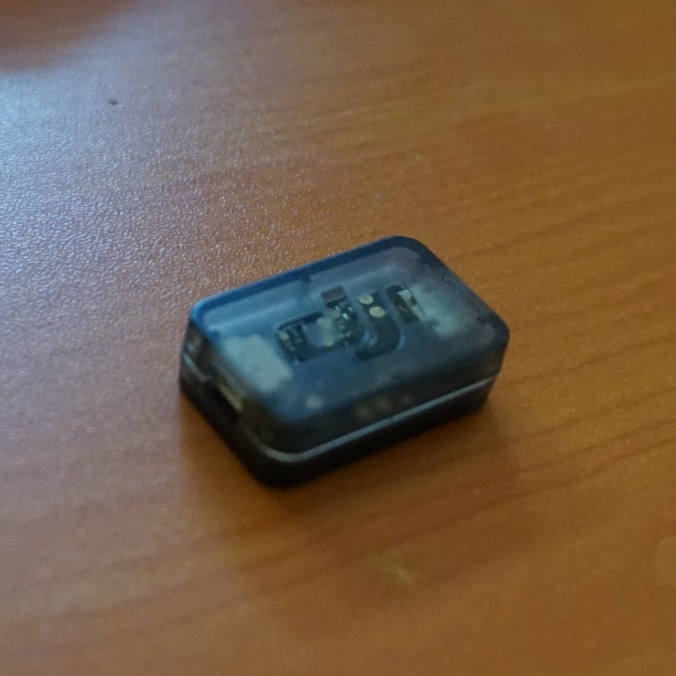
  2. We measured the distances of the A3, IMUs, and GPS pucks, triple checked and made sure the values were optimal and entered into the DJI Assistant 2.
  3. We balanced the propellers. Using a propeller balancer we checked to make sure they were evenly balanced – something many overlook.
  4. We checked and tested many different tightness/torqe settings on the propeller mounts. This is critical if your props are too tight they will not extend fully and will cause an off balance on each motor.
  5. We stripped down the S900 airframe and epoxyed the middle brace between landing gear.
  6. We checked all screw/bolt torque settings and made sure those which required it had Loctite added.
  7. We made sure cabling was not too tight and causing them to act as a tuning fork, sending vibrations down them to the lower part of the airframe.
  8. We checked the motor mount tightness.
  9. We adjusted the gains.
  10. We calibrated the compass and IMUs.
  11. We paid an addition £150 for a custom top plate to replace the stock S900 frame. This is a thicker carbon plate and also boasts a wider surface area.
  12. We tried to update the ESCs with the Smart ESC updater, however, it would only connect to 4 arms out of the 6.
  13. We checked to make sure the batteries were not touching the middle brace bar and passing vibrations on from the top plate.

Dronely S900 Top Plate

Dronely S900 Top Plate

If you want a reinforced top plate, then head over to Kopterworx.

At this stage, we were at a complete loss and sent the arms back to DJI via our UK supplier. What we received back was 3 new pairs of E1200s, however, these all had the old rubber mounts.

In addition to the rubber mounts we found that one pair of arms didn’t have the correct cut out on the motor mounts for the screw heads, and also had a slightly different design under the propeller mount – Seriously how hard is it to ask for 3 identical pairs of arms, especially when this is the second set being sent.

What we could do now however which we could not do with the last set of arms is update them. All arms were successfully updated to the latest firmware and had an ESC calibration performed via the DJI Assistant 2 software.

So we went on to install the arms and give them a test. Did anything change? Yes, for the better? No.

What we found was that we had the same issues as before, with what seemed like slightly fewer vibrations due to the rubber mounts on the motors, however, they were far from eliminated. So it seemed like we were at least heading in the right direction, but still at a loss of how to fix it.

We went out and tested the aircraft with a few more gain settings to no avail. We used 3 sets of batteries, totalling around 50-60 minutes of flight. What we had now noticed was that the rubber mounts had started to wear down already, we had heard of this from others but nothing quite as quick as this.
Dronely E1200 Motor Wear

So we stripped the arms off (again), boxed them up and will be shipping them back to DJI. In our opinion, the E1200s are not ready for the S900, and most likely will never be and thus should not be advertised as being so. We have since put the stock arms back on and guess what, there are NO issues.

Conclusions
We feel that we have vigorously tested these arms, and across two full sets, plus additional costs and loads of lost man hours. Our conclusions are that they are not fit for purpose – for an s900, and should not be used on the S900 airframe. DJI needs to seriously look at the design again because they do not work with the S900 as they are intended, at least that’s what we have found as well as others, and how much more testing are users supposed to do to get them to work?

In a nutshell, our opinion is, don’t buy the E1200s, and if you have them already and are having issues, send them back as you will most likely never get them to work correctly. What we would say is go for the M600/M600 Pro series if you want the extra power.

I should say, there is a handful who are using them on the S900 who supposedly have no issues when using the E1200s in conjunction with the added cost of the reinforced top plate, however, we have never seen any pre-post footage from them and it’s most likely because in reality, it’s not any good.

We have reached out to DJI direct on multiple occasions via their website and had little to no response on the matter. If you are having issues with the E1200s or any other industrial product then head over to DJI Industrial Solutions on Facebook where users and some select DJI staff really will help.

For more information go to: www.dronely.uk


DJI A3 Pro Flight Controller: The Correct Setup

DJI released their current flagship flight controller and upgrade modules back in 2016 and since then they have been used on a huge range of systems, one of our favourites is the Acecore Technologies: NEO – The design alone is enough to think you would have pinned up a poster of it back when you were a teenager.

With the A3 series, like most new technology in this industry there are teething issues with compatibility, and none more so than with DJI products. We’ve all heard about those that jump on DJIs products such as the Inspire range to be known as the beta testers. It is for this reason that you find many operators holding off for six months to a year in order to sit back and see what unravels.

DJI is a big player in our industry, some may argue the biggest. Sure they have the biggest reach with a ton of products but its when you go to the high-end of industrial applications that you see other manufacturers with much more refined systems – such as the Zenith – however saying that DJI have also just released their M200 series, and it looks very interesting, but without testing one and seeing how teething issues pan out over the next year, we are not ready to make a judgement.

The A3 on its own comes with the main flight controller unit, which houses the usual internal IMU, and comes with an attaching GPS puck. The pro system comes with the A3 main unit, 2 additional IMU units as well as the internal IMU of the A3, and 3 GPS pucks.

This all means that the A3 Pro has triple redundancy in IMU measurements and GPS readings, a bit plus for those operating in sensitive and tricky locations.

With all this kit though, you need to be able to know how to mount it correctly, and there is a ton of conflicting information out there on what the ‘best’ way is to mount the hardware to your drone.

The bottom line here is that DJI developed the A3 system and so what they say in regards to its installation should be taken above all unless there is a clear typo! With this said, you will find many operators telling you how they think its best to interpret the instructions – the most common is for the flight controller location to be entered relative to the centre of gravity and then both additional IMUs and three GPS pucks to be relative to the A3, this, however, is wrong.

The way to do it is simple, here’s a quick breakdown of how to do it.

  1. Mount the A3, IMUs, and GPS Pucks according to the manual.
  2. Get your centre of gravity in the middle, this may require movement of the batteries.
  3. Measure where your COG is – it should be in the middle and is usually a few inches bellow the top of the system (payload depending).
  4. Measure where all the A3 hardware is in relation to the COG.
  5. Input this data into the DJI Assistant 2 software.
  6. Remember – Everything is relative from the COG, not from the A3 main unit.

Here is our setup for the A3 Pro on a custom X5 series S900.

For more information go to www.dronely.uk


Drones & Airports: Can drones be used to inspect runways?

Drones have been around for a long time but in recent years the application of the ‘multi-rotor’ design has taken up the number one spot in both commercial and hobby sectors. So naturally, there is a new task or application being considered with their use nearly daily.

We’ve seen everything from the beautiful aesthetic video in blockbuster films, structural inspections, to coordinated light shows from swarms of these brilliant machines, and of course everything in-between.

Dronely always takes the approach of thinking how can we make our systems work for the client. Not a day goes by where we don’t think – ‘what’s next? How can that be made easier? How can drones make X more efficient?!’.

Recently the news has started to cover the use of drones with more rigour, and much are reports of ‘possible’ drone sightings near airports or runways, so naturally many shy away from the idea of using these machines in the proximity of an airport for the fear of endangering travelers and aircraft.

The reality is much different, drones have been used on site at airports for a while now, Easyjet even has its own fleet for inspections. The truth is, drones provide a level of access unmatched by other current methods, and they will only become more practical as time goes on and attitudes evolve toward them.

With that in mind, we thought it was time to look at another area where drones could be useful at airports. The thought? Apart from the aircraft, what else is absolutely integral to a safe flight?

The Runway, of course! It comes back to that old saying by Sir Isaac Newton – ‘What goes up, must come down’.

www.dronely.uk

Cement Construction Labor Worker Runway Patching – Image courtesy (CC) of Max Pixel

Runway maintenance is no small task, it’s a constant cycle of checks and repairs.

Runway surface integrity is met through regular inspections. Maintenance requires renewal of the wearing surface (the top). The intervals at which the re-surfacing occurs is dependent on the type of surface. Concrete and asphalt are the most commonly used surfaces. Not only does the surface need to be re-made, rubber deposits also needs to be removed.

Just from a visual point, drones can speed up the identification of issues such as rubber deposits, cracks, and other wear on the surface of the runway. Dronely is currently working towards creating a solution to use drones to carry out such tasks.

The goal here is not just to fly around and mark potential areas for detailed inspection and/or repair, that’s the starting point, the end goal is for the system to intelligently identify issues and report them back to the repair team.

For more information go to Dronely’s website: www.dronely.uk

CAA Changes to Insurance for Commerical Drone Operators

The CAA (Civil Aviation Authority) issued a statement to all commercial operators on Wednesday – 05/04/2017.
In the CAA’s statement which was sent via email, it stresses that all commercial operators must make sure their insurance cover is EC Regulation (758/2004) compliant.

So what does this mean for commercial operators? In truth, not a lot. It’s simply now a requirement that any insurance schedule issued by an insurer details that its cover meets the minimum requirements for EC Regulation (758/2004).

Simply put this is a change that happens at the insurer’s end, but it’s something that any operator should still know about and understand.

The CAA have stated that any application for permissions (PfCO/PfAW) whether they be new, variations or renewals must have insurance cover that provides evidence of such compliance, if not it will cause delays to application processing times, or at worst denial for permissions and that means lots of ground time.

Dronely Ltd currently works with Coverdrone for our commercial insurance needs, but other big players in the ‘drone insurance’ scene have been quick to act, such as Moonrock.

Coverdrone even have the ‘Fully compliant with EC 785/2004’ tag on their landing page of their website: www.coverdrone.com

Dronely_CoverDroneCompliant.PNG

Moonrocks MD – Simon Ritterband was quick to send a message to the ARPAS – Association of Remotely Piloted Aircraft Systems user group to let them know that they were on top of things and would be sending out an email to all their clients.

So what do you need to look for in the insurance documents to make sure you as an operator or the operator you are hiring is compliant? Simply make sure the insurance documents mention EC 785/2004.

If you want to read the full breakdown of what EC 785/2004 is, then head to EUR-Lex – the Official Journal of the European Union.

Alternatively, you can read up on EC 785/2004 from the UK Parliment publications website.
For more information, check out Dronely Ltd.